|
Initially Published on July 11th, 2015 |
Updated on Sept 9th, 2022
See the LinkedIn Pulse
version of the article here at
Using Indicator Symbols in Task/Resource Tables in
Graphical Reports
Please first see
Disclaimer section at the
bottom.
This
document is related to the standalone desktop
editions of MS Project Professional/Standard 2013 and
later.
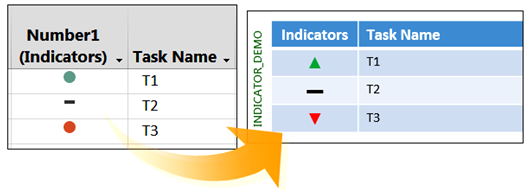
In this example, we will create a custom graphical
report containing a task table that displays graphical
indicators based on the values that a custom number
field holds for the tasks in the active project plan
(see the picture above). It
takes about 15 to 20 minutes to create such a report,
but that will be a one-time job. Then you can use the report
for all the project plan files in your desktop. Let us
start with creating the custom graphical report; follow
the steps below:
Watch the video
here. The project plan template used
to test the custom graphical report at the end of the video demonstration has
been obtained from the product website.
-
Open a blank project plan. Do not save
it.
-
Create three tasks just by entering task
names.
We
will populate the custom number field with values
entered by typing in, but you can enter any formula to
that field, for example, a formula interpreting variances
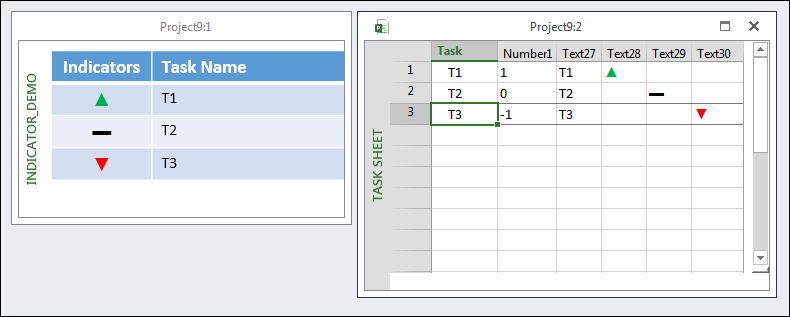
according to certain thresholds in the schedule. Enter the values 1, 0 and -1 to the
Number1 field for the tasks.
-
Enter the following formulas to the
task custom text fields Text27, Text28,
Text29 and Text30, respectively:
Text27:
Left( [Name], 70 )
Text28:
iif( [Number1] > 0, "▲", "" )
Text29:
iif( [Number1] = 0, "▬", "" )
Text30:
iif( [Number1] < 0, "▼", "" )
Table #1: a table with the fields Text27,
Text28
Rename Text27 column as “Task Name” and
reposition it as the 2nd column, enter a
proper width, such as 7 inches, in order to eliminate
any text wrapping of the task names trimmed to 70
characters. Text wrapping will destroy the alignment of
the rows.
Rename Text28 column as “Indicators” (it is now
the 1st column), align its content including
the header to center, set the font color to
green
for
the content, double-click the right border for best
fitting.
Table #2: a table containing the field Text29
Table #3: a table containing the field Text30
Align content to center in both tables. Set the width of
both tables to the width of the Indicators column in
Table #1. In both tables; remove the headers by entering
space and set style to the preset style “No Style, No
Grid”. In Table #3, set the font color to
red
in
Text30’s column.
-
Now reposition the transparent tables
(that is, Table #2 and #3) to the same position as
the first one (that is, Table #1).
-
Next split the view and show the Task
Sheet view on the bottom pane; or open
new windows (use <Shift+F11>) and arrange them. Then
add new tasks, change Number1’s values in
order to see how the indicator symbols change.
-
Copy the custom text fields and
the custom graphical report to the Global template
and close the project plan without saving. The graphical report is now ready to
use.
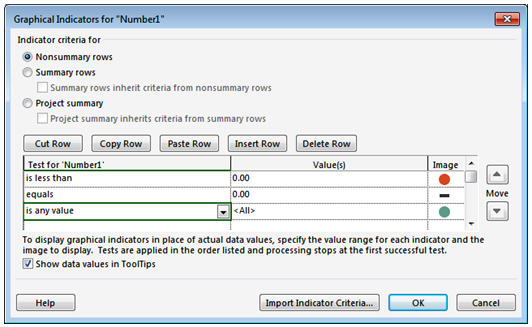
This
is the Graphical Indicators dialog box for
the task custom number field which displays
indicators in the task table:
|